

Últimamente estoy haciendo algunos cambios por aquí porque soy una persona a la que le gusta renovarse constantemente, lo que se extrapola a mi blog. Por suerte o por desgracia nunca estoy del todo satisfecha con el resultado (inconformista), y aunque muchos me decís que está muy bien (y os lo agradezco muchísimo), quiero que resulte sobretodo sencillo y fácil de leer. ¿Os gustan las galerías de imágenes que he puesto en la sección Cook y DIY? Creo que de esta forma es mucho más fácil navegar por el blog y con un golpe de vista podemos ir directamente a lo que nos interesa, ¿qué opináis?
Hi people!
I've been making some changes around here lately, and that's because I'm a person who likes to renew herself constantly, what extrapolates to my blog. For better or worse, I'm never totally satisfied with the result (non-conformist), and even though some of you have told me that is very good (and I appreciate it very much), I want it to be simple and easy to read above all. Do you like the new image galleries I've put on the Cook and DIY sections? I think this way is much easier to surf the blog and just with a glance we are able to go directly to what we're interested in, what do you think?
Bueeeeeno, y sin más charla por fiiiin os traigo la tan deseada receta de la tarta que hice por mi cumpleaños :) Elegí hacer esta tarta porque lleva dos de mis sabores favoritos y que combinan a la perfección: fresa y chocolate. Me ha llevado tiempo porque es una receta larga y quería dejarlo todo bien claro, aún así si al final de leerla o a la hora de prepararla encontraseis cualquier problema o dificultad, sabéis que podéis (y debéis) dejarme un comentario con vuestras dudillas (porfi). Desgraciadamente no tengo muchas fotos de esta receta porque la hice con prisa, os dejo las pocas que hice con el móvil así que perdonad por la calidad.
Primero veremos cómo hacer el bizcocho y a continuación os
explicaré como conseguir el swiss meringue buttercream de fresas naturales
(necesitas varillas eléctricas para que salga bien). ¡Espero que os guste!
Weeeeeell, and without further ado I finally leave you the so-desired recipe of the layer cake I made for my birthday :) I chosed to make this cake because it has two of my favourite flavours that combine harmoniously: chocolate and strawberry. It's taken a while because it's a long recipe and I wanted to leave it very clear. However, if you found any trouble or difficulty after reading it or when it's time to prepare it, you know that you can (and must) leave me a comment with your doubts (please). Unfortunately I don't have many pictures of this recipe because I made it in a hurry. I leave you the few ones I took with the mobile so excuse the quality.
In first place we’ll see how to make the sponge cake and in second place I’ll explain how to prepare the strawberry swiss meringue buttercream (you’ll need an electric whisk to make it). Hope you like it!

Para hacer el bizcocho utilicé una mezcla de estas dos recetas,
pinchando en la imagen podréis acceder a ellas:
To make the
sponge cake I mixed this two recipes, if you click on the images you can see the them:


Os voy
a dejar directamente la receta tal y como la hice yo, creo que reúne lo mejor
de ambas.
I’m leaving the recipe directly like I made it,
I think it gathers the best from each one.
Ingtredientes - Ingredients:
- 170 gr. De harina (un poco más para enharinar los moldes)
/ 1 + 3/4 cups all-purpose flour, plus more for
pans
- 450 gr. De azúcar / 2 cups sugar
- 90 gr. De cacao en polvo natural sin azúcar añadido
(Valor) / 3/4 cups good cocoa powder
- 1 y ½ cucharaditas
de bicarbonato sódico / 1 + ½ tsp baking soda
- ½ cucharadita de levadura química (Royal) / ½ tsp
baking powder
- 1 cucharadita de sal gorda molida / 1 tsp grinded cooking
salt
- 225 mL (1 taza) de buttermilk (más abajo explico cómo
hacerlo casero) / 1 cup buttermilk (I explain
how to do it downwards)
- 120 mL de aceite de oliva (si es suave mejor aunque yo
empleé virgen extra y quedó genial) / 1/2 cup
olive oil (It’s better if it’s soft, but I use extra virgin and it was perfect)
- 2 huevos grandes (a temperatura ambiente) / 2 large eggs, at room temperature
- 1 cucharadita de extracto de vainilla líquida / 1 tsp pure vanilla extract
- 1 taza de café caliente recién hecho / 1 cup freshly brewed hot coffee
- 50 gr. De chocolate 70% cortado en trocitos / ¼ cup dark
chocolate cut into little pieces
Preparación –
Directions:
Precalienta el horno a 180º y prepara el molde. Yo utilicé
un molde desmontable, lo enhariné y coloqué papel de horno en la base.
Preheat the oven to 350 degrees F and prepare
the cake pans. I used a removable bottom cake pan, covered it with flour and
covered the bottom with parchment paper.
En un bol grande tamiza todos los ingredientes secos y
mézclalos hasta que se integren bien: la harina, el azúcar, el cacao, el
bicarbonato y la levadura y la sal.
In a big bowl, sift the dry ingredients and mix
until combined: flour, sugar, cocoa, baking soda, baking powder and salt.
En otro bol, bate con las varillas (manuales o eléctricas)
los huevos y el azúcar hasta que blanqueen. Añade entonces el buttermilk y la
vainilla. Mézclalo todo bien hasta que esté completamente integrado.
In another bowl, beat the eggs and the sugar
with the whisk (electric or manual) until they become white. Then, add the
buttermilk and the vanilla extract. Mix all until combined.
*¿Qué es el buttermilk? El buttermilk es el suero que se
obtiene cuando se bate la nata y se convierte en mantequilla. Se utiliza en
multitud de recetas de repostería ya que le da mucha jugosidad a nuestros
horneados e intensifica el sabor. Tiene una ligera acidez, por lo que se
utiliza con bicarbonato sódico que la neutraliza. Puedes comprarlo en algunos
supermercados como el Lidl, pero sinceramente, yo lo hago en casa y es
facilísimo, tan solo llena una taza con leche a temperatura ambiente (da igual
que sea desnatada o entera pero ¡no de la nevera!) y añádele el jugo de medio
limón, déjalo reposar 10 minutos y ya tienes tu buttermilk (tendrá un aspecto
de leche cortada pero no te preocupes, ¡es así!).
*What’s buttermilk? Buttermilk is the whey
obtained when you beat cream and it becomes butter. It’s used in a lot of
confectionery recipes because it gives juiciness to bakery and it intensifies
the flavor. It’s slightly acid and that’s why it’s used with baking soda,
because the latter neutralizes this acidity. You can find them in some
supermarkets like Lidl, but honestly, I make it at home and it’s very easy.
Just fill a cup of milk at room temperature (it doesn’t mind if it’s skim or
whole milk, but NOT from the fridge) and add the juice of half lemon. Leave it
for 10 minutes and you have it! (It will have an aspect of sour milk but don’t
worry, it’s that way).
Poco a poco (nunca de golpe) y removiendo continuamente con
las varillas, añade los ingredientes líquidos a los sólidos. Por último echa el
café (caliente) e intégralo todo.
Gradually
and constantly stiring, add the liquid ingredients to the dry ones. Finally add
the hot coffee and mix all.
Ya tienes la masa del bizcocho, no te preocupes si está un
poco líquida. Suavemente, viértela en el molde e introdúcelo en el horno
durante 35-40 minutos o hasta que pinchando con un palito en el centro este
salga limpio.
You already have your sponge cake pastry. Don’t
worry if it’s a little liquid. Carefully, pour it in your cake pan and bake for
35-40 minutes or until a cake tester or toothpick comes out clean.

¡OJO! Jamás abras el horno durante esos 35-40 minutos ya que si lo haces la temperatura del horno descenderá y el bizcocho bajará de inmediato, y difícilmente conseguirás que suba después.

¡OJO! Jamás abras el horno durante esos 35-40 minutos ya que si lo haces la temperatura del horno descenderá y el bizcocho bajará de inmediato, y difícilmente conseguirás que suba después.
ATENTION! Never open
the oven during the baking time, because if you do it the oven’s temperature
will decrease and your sponge cake will immediately come down, and it hardly
will go up again.
Transcurrido el tiempo adecuado introducid un palito en el
centro del bizcocho, si sale limpio es que ya está listo, si no metedlo otros
5-10 minutos y volved a comprobar.
After 35-40 minutes introduce the cake tester
in the center, if it comes out clean the cake will be ready, If not bake for
5-10 minutes more and check again.

Una vez esté a temperatura ambiente yo recomiendo envolverlo
en papel film y meterlo en la nevera durante toda la noche. De esta forma el
bizcocho asienta y adquiere más cuerpo, además no se reseca y el papel film
ayuda a que esté más jugoso y esponjoso.
When it’s ready take it out the oven being
careful to avoid burning yourself and turn it out onto a cooling rack.
Once it’s at room temperature I recommend you
to wrap it with plastic wrap and keep in the fridge during the night. This way
the sponge cake takes shape and acquires consistence, doesn’t get dry and the
plastic wrap helps it to be more spongy.

El swiss meringue buttercream es una versión con más sabor, más
suave y menos empalagosa que el buttercream corriente, pero también es más
difícil de preparar. Aun así no os desaniméis, yo lo hice por primera vez para
esta receta y me quedó perfecto, eso sí, con ayuda de unas varillas eléctricas
(no os recomiendo hacerlo a mano a menos que queráis estar batiendo toda la
noche). No hace falta tener máquinas carísimas como la Kitchen Aid, nos sirve la
batidora de toda la vida con un accesorio de varillas, o una batidora amasadora
como estas de aquí abajo:
The swiss meringue buttercream is a better
versión of the common buttercream. It has more flavour, it’s softer and less
sweet, but it’s also harder to prepare. However, don’t get discouraged, I made
it for the first time for this recipe and it was perfect. Now, with the help of
an electric whisk (I don’t recommend you to make it by hand unless you want to
be beating for the whole night). It’s not necessary to have expensive mixers
like the Kitchen Aid, it’s enough with something like this:
Os recomiendo prepararlo el mismo día que vayáis a rellenar
y decorar la tarta ya que no se puede conservar durante mucho tiempo y si lo
dejáis un día entero en la nevera es probable que se endurezca demasiado.
I recommend you to prepare it the same day that
you fill and decorate your cake, because you can’t keep it for a long time and
if you leave it I the fridge for a day it will probably be too hard.
Ingredientes –
Ingredients:
- 3 claras de huevo/150 gr. (Asegúrate de que no haya NADA de
yema. Puedes separar las claras de huevo a mano, yo las compro pasteurizadas en
el Mercadona) / 3 egg whites (make sure there is no yolk. You can separate the whites by hand, but I buy
pasteurized ones in the supermarket)
- 250 gr. De azúcar / 1 cup sugar
- 350 gr. De mantequilla SIN SAL a temperatura ambiente
cortada en cubitos de 5 cm (os recomiendo sacarla de la nevera antes de empezar
con el bizcocho) / 1 + ¾ cups butter at room temperatura without salt. Cut it into médium pieces (I
recommend you to take it out of the fridge before starting with the recipe)
- 1 pizca de
sal / A pinch of salt
- 75 gr. De fresas trituradas / 75 gr. mashed strawberries
- 1 cucharadita de extracto/esencia de vainilla (opcional) / 1
tsp vanilla extract (optional)
- 1 cucharada de mermelada de fresa/frambuesa (opcional) / 1
tbsp strawbery/raspberry jam (optional)
Preparación –
Directions:
Ponemos un recipiente al baño maría con las claras, el
azúcar y la pizca de sal. El agua debe estar a temperatura media y sin llegar a
hervir. Removemos constantemente con unas varillas para disolver el azúcar y
evitar que cuajen las claras.
Put a container in bain-marie with the egg whites, the sugar and the pinch of
salt. The water must be at medium temperature but never boiling. Stir with the
whisk to dissolve the sugar and to avoid the whites from curdleing.
Cuando hayan pasado alrededor de 5 minutos las claras
blanquearán, entonces retiramos del fuego y colocamos nuestro recipiente sobre
otro con agua muy fría durante 15 minutos para que se enfríe bien.
After 5 minutes the mixture will turn white,
then remove the container from the stove and put it into another container with
cold water for 15 minutes to cool it.
Cuando esté frío batimos con las varillas eléctricas unos 20
minutos (parece mucho pero cuanto más, mejor) o hasta que veamos que se ha
formado un merengue cremoso, nunca líquido.
When it’s cold, beat with the electric whisk
for 20 minutes (it seems a long time but the longer, the better) or until it
has a soft and creamy consistency, never liquid.
Ve añadiendo los cubitos de mantequilla muy poco a poco sin
dejar de batir (cuando unos se integren, echa los siguientes). Con ayuda de una
espátula incorporamos la mantequilla que se pegue a las paredes y continuamos
batiendo hasta que la mantequilla esté completamente integrada y el buttercream tenga consistencia parecida a la del helado.
¡OJO! Puede que de repente la masa parezca estar “cortada”,
no asustarse, tan solo seguiiiid batiendo y conseguiréis la consistencia
adecuada (suave y sedosa).
Gradually, add the pieces of butter while
constantly stiring (when a few are combined, add some more). With the help of a spatula add the butter
from the walls of the container and keep on beating until the butter is well
combined and the buttercream's consistency is similar to the ice-cream one.
ATTENTION! It may happen that the mixture seems
like “sour”, but don’t be afraid, just continue beating and you’ll obtain the
right consistency (soft and creamy).
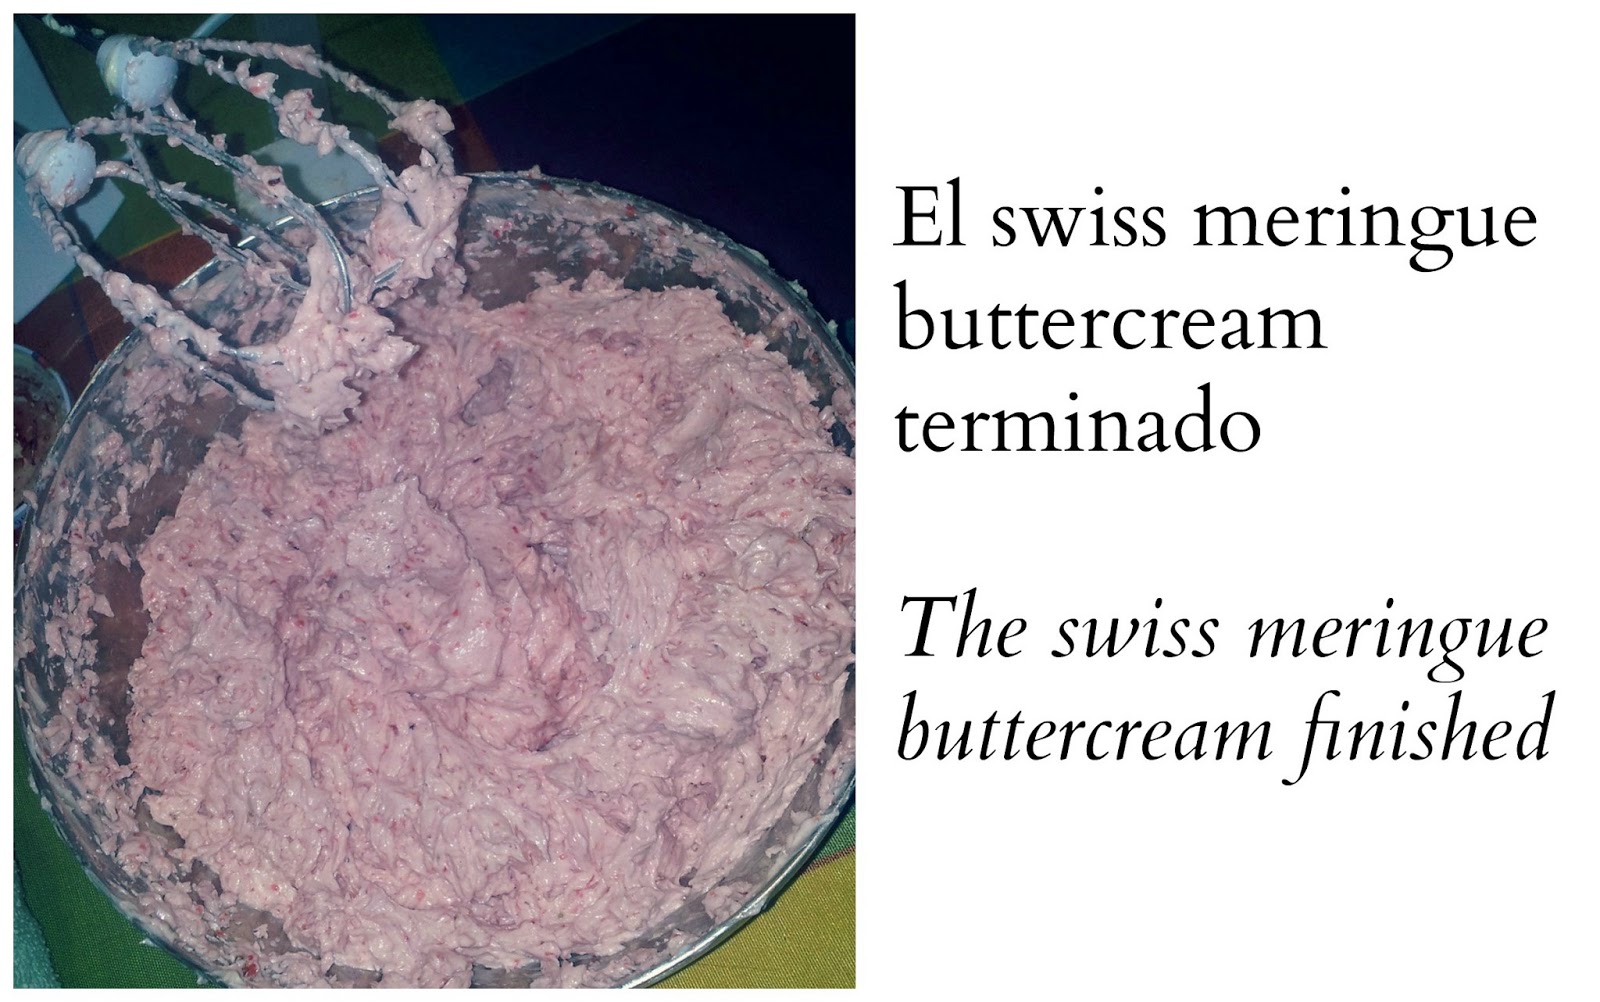
Llegados a este punto ya tendríamos nuestro swiss meringue
buttercream listo para utilizar tal cual para rellenar y decorar nuestra tarta,
pero en este caso le daremos sabor a fresa, para ello:
Añadimos las fresas trituradas, la esencia de vainilla y la
cucharada de mermelada. Batimos de nuevo hasta integrar completamente y ¡listo!
At this point, you already have the swiss
meringue buttercream ready to be used to fill and decorate the cake, but in
this case it has strawberry flavour, then:
Add the mashed strawberries, the vanilla
extract and the jam. Beat again until combined and ready!

Por último ya solo os queda abrir el bizcocho en dos, rellenarlo con el swiss meringue buttercream de fresas (si no os lo habéis comido ya) y cubrir la tarta con ayuda de una espátula. ¡Y ahora a decorarla con creatividad!
Finally you have to open the sponge cake in two, fill it with the strawberry swiss meringue buttercream (if you haven't eaten it already) and cover the cake with a spatula. And now just decorate it with creativity!


---------------------------------------------------------------------------------
Did you like it? It's really more than delicious and it's worth it spending an afternoon in the kitchen just to taste this delicacy. Everyone who tasted it loved it, so I hope you also do when you taste it!
Ya sabéis, si la hacéis, mandadme vuestras fotos para que pueda ponerlas aquí o etiquetadlas en el Facebook de DTH
You know, If you do it, send me your pictures so I can put them here or label them with the DTH Facebook
Espero vuestros comentarios, muchos besitos :)
I wait for your comments, kisses :)
¿Te atreves?I dare you
Sara...claro q nos gusta! Nos gusta la tarta,las plantas,los collares... Y lo más importante...nos gustas TU!!! Muchas felicidades por tu blog! Un besazo desde zgz
ResponderEliminar