


¡Hola chicas! ¿Qué tal han ido las vacaciones?
Tras una visita a Barcelona y cómo no al pueblito bueno, estoy por fin de vuelta :(
Se hace duro volver a la rutina después de tantos días de fiesta (y con las torrijas aún en el estómago), pero no queda otra. Aún así estoy animada y ya que ha llegado la primavera (aunque no lo parezca, por lo menos en Madrid) quería hacer algún DIY más fresquito y alegre, así que por fin me he decidido a hacer esta camiseta que llevaba tiempo rondándome la cabeza. Me encantan este tipo de espaldas, de hecho me he inspirado en una camiseta que ya tenía. ¡Que lo disfrutéis!
Hi girls! How was your Easter holiday?
After visiting Barcelona and of course, spending some days in my village, I'm finally back at home! :(
It's hard to get back into routine after spending so many days out, but there's no choice. Still, I'm encouraged and now that the spring has come (surprising though it may seem, at least in Madrid) I wanted to make a fresher and brighter DIY, so I've finally decided to make this top which has been in my head for a long time. I love this kind of backs, in fact I was inspired by a shirt that I already had. Enjoy it!


Necesitaréis:
♥ Una camiseta básica de manga corta de chico. Yo he utilizado esta del Primark (3€, ya que
nos la vamos a cargar que sea barata). Esta es de la talla S (porque al ser de chico queda anchita,
pero si la queréis más ancha probad otra talla)
♥ Tijeras
♥ Hilo y aguja
♥ Un lazo ancho de un color que quede bien con el de la camiseta
♥ Otro lazo diferente para tapar las costuras del cuello (opcional, podéis incluso
usar dos trocitos del mismo lazo que utilicéis para hacer la espalda)
usar dos trocitos del mismo lazo que utilicéis para hacer la espalda)
You will need:
♥ A basic boy T-shirt. I've used this one from Primark (3€, better if it's cheap, as we're going
to cut it). This one is size small (as it's a boy tee it's loose-fitting, but if you want it wider try
with other sizes)
♥ Scissors
♥ Needle and thread
♥ A wide ribbon of a colour that goes well with your T-shirt colour
♥ A different ribbon to cover the neck seams (this is optional, you can use the same
ribbon you used for the back)
ribbon you used for the back)


PARTE DELANTERA DE LA CAMISETA
1. Traza en tu camiseta con una tiza de sastre (en su defecto con lápiz) las líneas que ves en la imagen, y corta por ellas a continuación. Pruébate la camiseta y si a tu parecer los tirantes quedan demasiado anchos córtalos un poco más (puedes doblar la camiseta por la mitad par que te queden del mismo ancho)
NO TIRES LAS MANGAS (aquí todo se aprovecha)
FRONT SIDE OF THE T-SHIRT
1. With a taylor's chalk (failing that, with pencil) draw on your tee the lines you can see on the image, and then, cut them out. Try on the T-shirt and if you think the straps are too wide cut them out a bit more (you can fold your tee over so they are the same width)
DON'T THROW THE SLEEVES AWAY (we'll take advantage of them)

PARTE TRASERA DE LA CAMISETA
2. De nuevo traza las líneas de la imagen y corta por ellas. ¡CUIDADO! Asegúrate de cortar SOLO la tela de la parte trasera, no vayas a cortar toda la camiseta (en un descuido puede pasar)
BACKSIDE OF THE T-SHIRT
2. Again, draw the lines on the image and cut them out. ¡BEWARE! Make sure you just cut the backside fabric, don't cut all the tee (it's possible in a moment of distraction)

3. A partir de las mangas, recorta tres tiras largas, trénzalas y sujeta los extremos con unas puntadas. No utilices toda la manga porque después necesitarás hacer más tiras
3. From the sleeves, cut out three long strips, braid them and hold the ends with some stitches. Don't use the whole sleeve because afterwads you'll need to make more strips
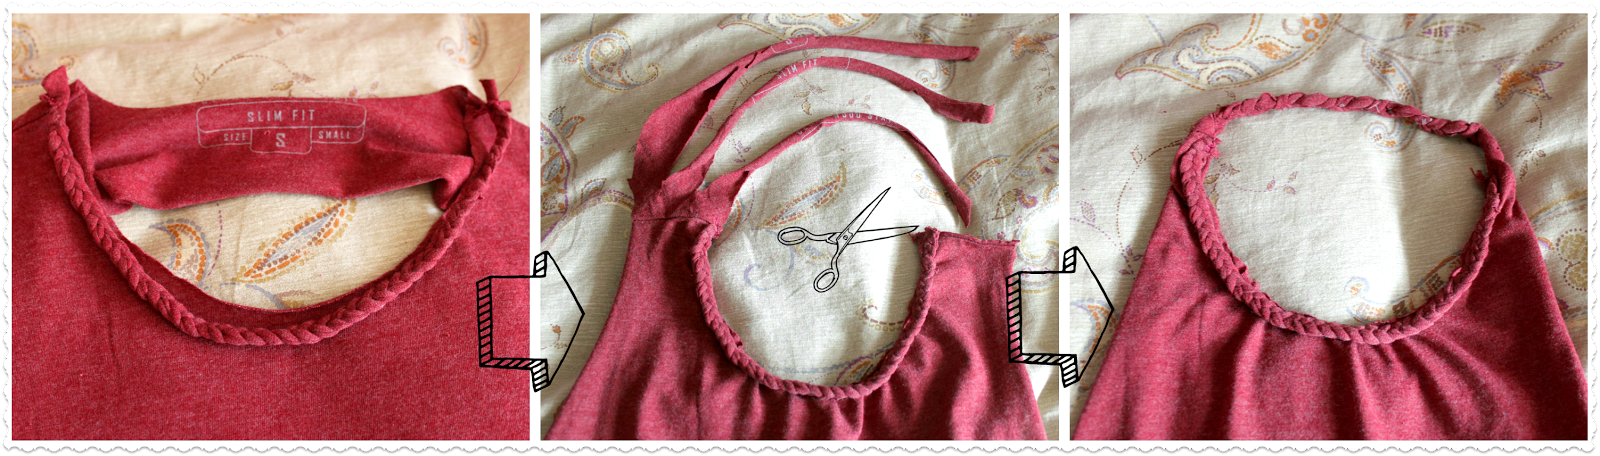
4. Cose la trenza que acabas de hacer sobre la parte delantera del cuello de la camiseta. Corta la parte trasera del cuello solo por un extremo y divide la tela en tres tiras tal y como muestra la imagen. Trenza las tiras y cose el extremo de la trenza al cuello de la camiseta
4. Sew the braid you've just made over the T-shirt's front neck side. The remaining part of the backside neck should be cut on the left side and divided into three equal strips as the image shows. Braid the strips and sew the end of the braid to the neck of the tee

5. Haz otra trenza como la anterior para la espalda. La trenza tiene que ser un poco más corta que el ancho de la camiseta en esa zona, ya que al ser la trenza elástica, hará que la camiseta se ajuste a nuestra espalda. Cose primero las esquinas y después el resto.
5. Make another braid like the previous one for the back. It has to be a bit shorter than the tee width in that zone, because as the braid is elastic, it will make the top more close-fitting to our back. Sew the ends first and then the rest of it.

6. Now let's make the back strap. Turn your tee over and sew one of the ribbon ends in the area of the braid. Then, pass it through the neck as the image shows and sew the other end (at the same distance to the T-shirt side as the other end)

Por último tapa con tu lazo (u otro diferente) la zona en la que se unen la parte delantera del cuello con la parte trasera. Si quieres corta un poco el largo de la camiseta (pruébatela primero) y YA TIENES TU CAMISETA PRIMAVERAL. Perfecto para diario o para salir, ¡espero que te guste! :)
Finally, cover with your ribbon (or a different one), the stitches that connect the front side of the neck with the backside of it. If you want, cut the lenght of the top a bit (try it on first) and YOU HAVE YOUR SPRING TOP. Perfect for a day and night outfit, hope you like it! :)
-------------------------------------------------------------------------
Espero que te guste, deja tus comentarios y si te atreves compártelo! ¡Recuerda que puedes seguir a DTH en Facebook, Twitter y en Instagram!
I hope you like it. Leave your comments and if you try to do it, share it! Remember you can follow DTH on Facebook, Twitter and Instagram!
Muchos besitos :)
Kisses :)
¿Te atreves?
I dare you

Oye pues me gusta mucho el resultado!!! Voy a intentarlo con alguna camiseta vieja que no uso....
ResponderEliminarYa te contaré....
Besos.
Hola guapa!! madre mía, menuda artista estás echa!! yo sería incapaz de hacer algo así!!! te felicito por tu trabajo!! Besotes!!!
ResponderEliminarhttp://greatstyling.blogspot.com.es/
Es geniaaaaaaaal!
ResponderEliminarBesos!
Me encanta, te ha quedado genial!Besos!
ResponderEliminarMe encanta la idea, lo que no me va tanto es no usar tirantes en el sujetador, así que creo que te copiaré la idea con alguna variación, si quieres verla ya te invitaré al blog cuando la tenga. (si quieres ver mi blog antes busca este nombre en google)
ResponderEliminarSigue así
Bss